Owning a gaming PC with top-notch processing power is the fundamental need to play high-end modern-games. With each passing day, technology is advancing and new high-end GPUs are arriving to make your gaming experience worth a while. In the current market scenario, to build your own gaming PC from scratch is one of the most effective ways to satisfy all your personals preferences and needs.
When you decide everything from the power supply to your CPU to your GPU, you know that you’re going to be able to play the games at the frame rate you like. In addition to that, your home-built PC leaves the door open for upgrades—as technology evolves, your gaming preferences and needs change.
What’s more, building a gaming PC is not a herculean task, and to make it easier, we have brought to you a gaming PC build guide that will take you through all the steps you need to build up a top-notch gaming PC.
But before getting into the building part of your gaming PC, you need to ensure that you have all the essential ingredients with you. Here is everything that you will need during the build process.
Also Read: Best Gaming PC Build Under Rs.60,000.
Pick up gaming PC build tools and gather other vital components
Tools
The first step to build a gaming PC is to have the right tools in your inventory. It is necessary to gather the right tools to make sure that you won’t face any difficulty during the build process. Below are the two most important things that will help you complete the gaming PC build.
- Workspace: Make sure you have enough space to work on your PC. At the same time, make certain electrostatic charges don’t affect your components. You might want to stand on an uncarpeted floor.
- Screwdriver: A screwdriver kit is just as crucial as any other important component of your computer. Plus, you can use magnetic drivers so screws won’t drop.
PC Case
Prior to getting started with the PC building process or even buying the components, it is essential to choose a case or at least have a size in mind.
PC cases are generally available in three sizes, based on motherboard size:
- Mini Tower
- Mid Tower
- Full Tower
You can choose the case based on the following factors:
Where are you going to put the computer?
The location will determine how big of a case you can employ or which type of case you want to buy. For instance, if you’re going to place your CPU compartment under your desk, you might want to restrain yourself from buying a tempered glass side panel.
Besides, you can also look for some useful add-ons like spacious inwards, RGB lighting, water-cooling assistance, muffled sound, spacious inwards, etc.
Tips: Generally, mid-tower cases are perfect for most situations as it is large enough to accommodate all PC components, future upgrades, and offers enough ventilation for PC components. We suggest you choose mid-tower unless you have special requirements.
Also Read: Best Gaming Laptops Under 70,000 INR.
Buying gaming PC Building Components
Tip 1: Make sure you have a pre-planned budget in your mind before buying the component.
Tip 2: Prepare a component list and make sure each component is compatible with every other part.
Additional Tip: You might want to check the system requirements of the game that you are planning to run on our new gaming PC before buying the components.
Now, it is time for you to gather all the crucial components that will be needed during the gaming PC building process. You can thoroughly research individual elements on the internet and start buying components from scratch.
Here are the components that you will need during the gaming PC build:
- CPU (Central Processing Unit)
- GPU (Graphical Processing Unit)
- Motherboard
- RAM (Random Access Memory)
- Secondary Storage (HDD/SSD)
- PSU (Power supply unit)
- Cooling unit
- Operating System
In addition to the above-mentioned items, you might want to buy the required gaming peripherals too.
Once you have all the components, it is time for you to get started with the build process:
Installing CPU
Intel
Parts Required: CPU and Motherboard
This is the first actual step that you will contribute to your Gaming PC build. Stick to the following steps to install your Intel CPU.
- Remove the antistatic packaging of the CPU and put it on the surface.
- Find the CPU socket with a protective plastic cap. There will be a small arrow either on the cap or on the socket itself; keep in mind where this arrow is.
- To open the socket tray, press down the metal lever next to the CPU socket and pull it to the side, gently.
- Open the CPU and remove it from the packaging; it will have an arrow in the corner.
- Line up the arrow of CPU and CPU socket, and place the CPU onto the socket.
- Lower the lever and push it back into place.
Note: Sitting the CPU in won’t require you exert some external pressure. However, lowering the lever may need so.
Watch the following video to understand the Intel CPU installing processing better.

AMD
The process of installing AMD CPUs are slightly different from Intel’s as they have a different kind of socket. You will find the metal pins on the CPU itself. To install an AMD CPU stick to the following step:
- Find the CPU socket on the motherboard and pull up the retention arm into the vertical position.
- Find the golden triangle on your AMD CPU, it is supposed to correspond to an indented triangle on the CPU socket of the motherboard to help install the CPU right way.
- Place the CPU into the socket while ensuring all the pins should home into their corresponding ports.
- Make sure the CPU is correctly installed. After that, press the retention arm back into its place.
Note 1: Placing the CPU in the socket shouldn’t require any force, so if it doesn’t fit, don’t try to push it inside. On the contrary, remove it and start again.
Note 2: Pressing the retention arm back into the place on the socket might need some force so be prepared to press it. That said, the force need not be excessive.
If you are still facing problems while installing your AMD CPU, the below video will make things easy for you.
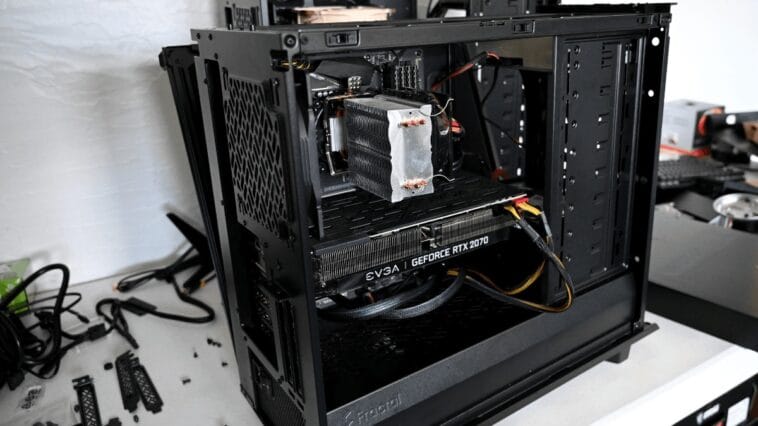
Setting Up CPU Cooler
Parts Required: CPU, Motherboard, and Cooling unit.
The next step is to prepare the cooling unit of your gaming PC. There is a wide variety of coolers available in the market, and installing each unit is different from the other. So, it is recommended that you follow the guidelines mentioned in the manual accompanying the cooling system.
Several coolers come with thermal paste pre-applied, while some don’t. In case you are using the former cooler, make sure:
- You apply thermal paste to the conductive material before you seat the cooler. Just squeeze the tube of thermal paste and release a small drop on the middle of the CPU.
- After that, just put the cooler on the CPU; the pressure between the two components will spread the paste.

Tips: Many cooling units require a mounting bracket. Check if your motherboard has a bracket and match the size with the cooling system or if the latter needs a bracket or not. You might have to replace the bracket if the cooler uses a different bracket.
Installing RAM
Parts required: Motherboard and RAM
The next step is to set your primary memory; it is necessary to find the number of RAM slots that your motherboard features, as installing RAM depends on this. Most motherboard comes with two or four slots, if you are thinking about filling all the slots, you won’t have to consider anything else, and you can place them directly into the slots.
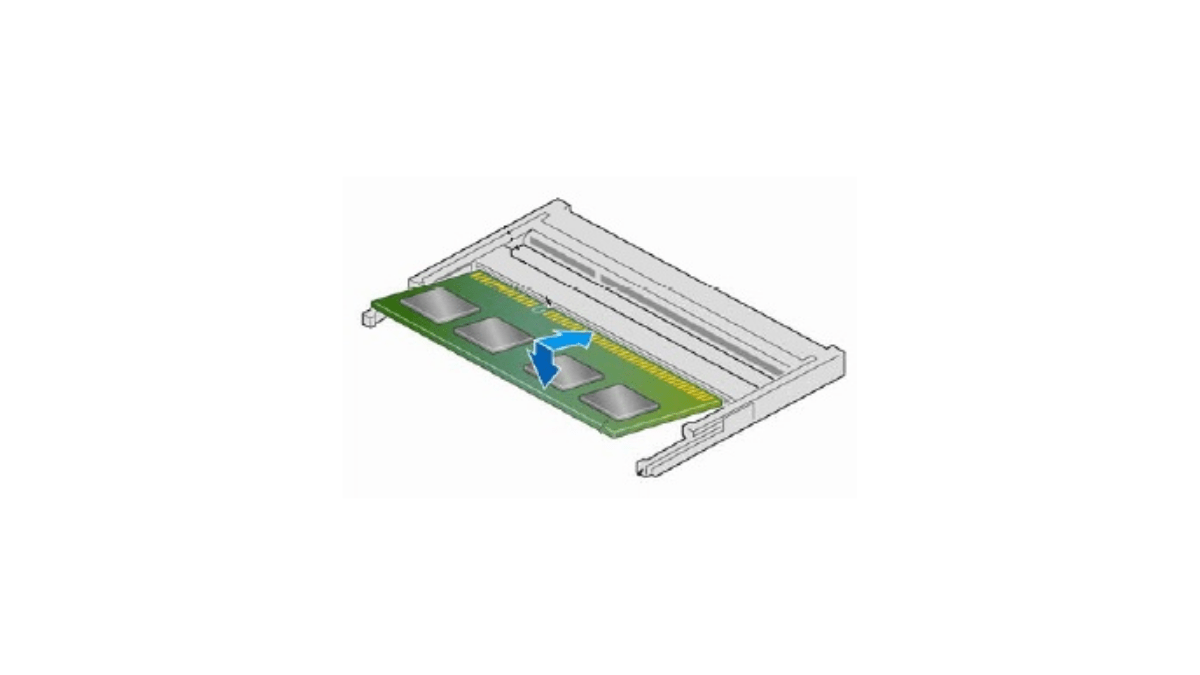
However, if you don’t want to fill all the slots, you might have to refer to the manual to find the configuration to install the RAM.
Tips: Dual-Channel mode offers slightly better performance, and we recommend it if you are buying 16/32/64 GB of RAM or have 4 DIMM Slots. To configure your RAM to operate in dual-channel, refer to your motherboard manual, many motherboards comes with color-coded DIMM slots for dual channel.
Installing Power Supply
Parts Required: PC case and PSU
After setting up your primary memory, now you need to install the power supply. Stick to the following steps to install it:

- Unpack the PSU.
- Take a look at your case. After that, figure out where the PSU is supposed to go and how it can be oriented.
- You can install the PSU upside down if your case has a vent on the bottom, as long as the bottom vent can receive good airflow once your gaming build is done.
- If there are no vents in your case, install the PSU so that the fan faces up into the case and make sure it has enough clearance.
- At last, with the help of the four screws that came with the PSU, connect the PSU to the case.
If you use a non-modular or semi-modular power supply, now is the time to run the linked cables through the case to where they’ll need to end up.
Placing Motherboard
Parts Required: Motherboard and PC case
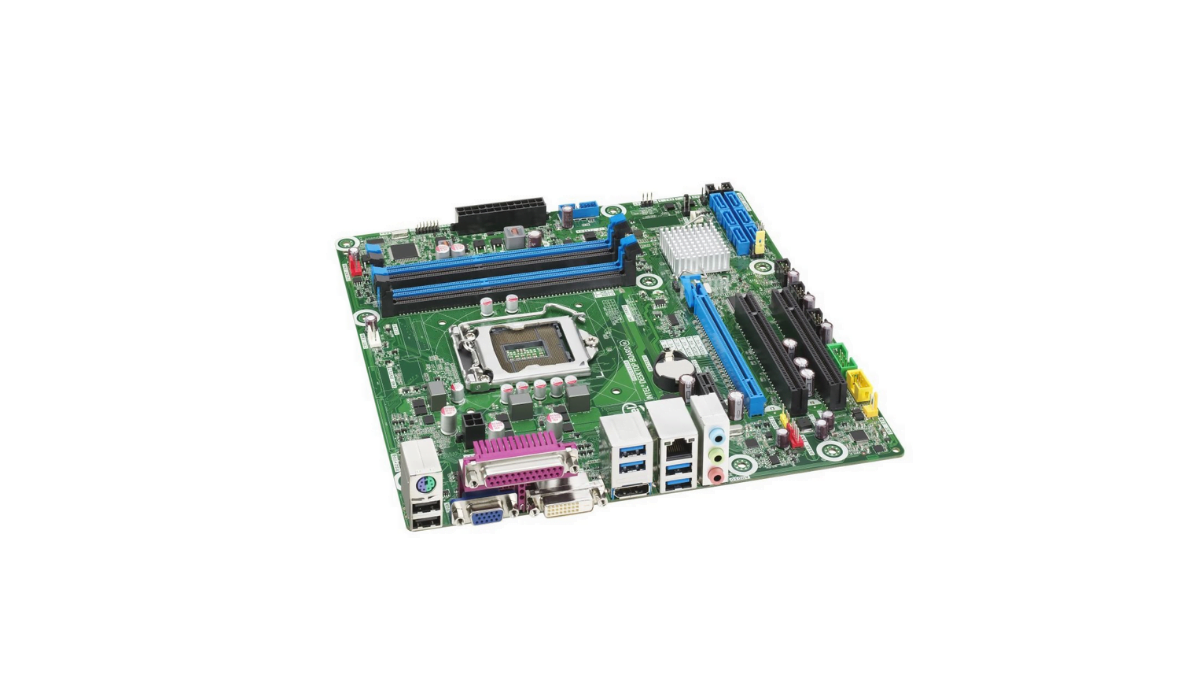
The motherboard forms the backbone of any computer as all of the components plug into the motherboard. Hence, installing it correctly is of the utmost importance.
If your motherboard has an unattached I/O shield, first snap it into the back of your case. Plus, I/O shields can have sharp points, so look out for your fingers. Once you are done with the I/O shield, you can install the motherboard.
- Double-check to ensure that all your cables are threaded to the right place, and then place the motherboard.
- Mount the first screw, the center screw, to hold the motherboard in a spot, using a screwdriver.
- Make sure that the motherboard does not pass through the standoffs connected to the Chassis.
- Fill out all the screw holes available in the motherboard.
- Link the source of power to the motherboard.
Connecting the power supply generally involves dealing with two primary connections. The first one is an 8-pin CPU connector, and the second one is a 24-pin connector. The former will be connected towards the top of the board, while the latter will connect to the side.
Note: The number of screws you need to mount the motherboard can vary depending on the board, but the full-size ATX motherboard usually takes nine screws.
Setting up GPU
Parts Required: Motherboard and GPU
Once you are done with the motherboard, it is time for you to deal with the GPU. To make things easier, here are a few things that you should take note of.
- You need to find the PCIe x16 slot on the motherboard; it will be the longest slot. In some instances, it can have different colors too.
- In case your motherboard has multiple slots, refer to the manual to prioritize one slot. If the CPU can be placed inside any slot, choose one based on the placement of other components.
- You might also need to remove I/O covers, to fit the I/O of your GPU.
Now, stick to the following steps:
- Remove the GPU from its adhesive packaging.
- Carefully position it with both the rear bracket and the slot itself.
- Gently push it into the PCIe* x16 slot.
- The PCIe* tab on the motherboard can switch to a locked place if you need to reset the GPU.
Note – If the GPU is completely seated, use one or two screws to connect it to the back of the case. If your GPU needs an ancillary power connector, link it to the power supply.
Installing Storage
Parts Required: Motherboard, PC Case, and HDD/SSD
First, go through the case, and somewhere inside your case, you should find a pile of bays of different sizes. In the case of tool-free bays, you will find small plastic switches. Otherwise, they may just look like metal brackets. In the case of a tool-free bay, each bay has its own lever.
If you have a tool-free bay, stick to the following steps:
- Open or unlock the lever or switch, and you should be able to take the tray out of it.
- Place the drive in the tray.
- Slide the tray back to the bay. It’s expected to click in place.
Note: Some 3.5-inch trays are designed to accommodate 2.5-inch trays. If they are, you have to screw the 2.5-inch drive to the 3.5-inch tray to prevent any kind of movement.
If you are using the metal bracket, you just need to slip the drive between the metal bracket and the side of your case. After that, just screw it in place.
Note: Refer to the chassis manual to find the recommended number of screws. In case you don’t have the right number of screws, you can always screw the drives with two screws.
Once your drive/ drives are in place, link it/them to the motherboard with the SATA cable and to the power supply.
Installing Operating System
Parts Required: Bootable OS
Now, your CPU is ready to install the operating system. This is the last component you need to build your gaming PC.
If you haven’t already prepared your operating system (OS) for a USB flash disk, now is the time to do so. Before that, you’ll want to check to make sure that all of your components are mounted.
Follow these steps to install the operating system on your computer:
- Plugin the USB flash drive that holds your OS and turn your PC on.
- The first screen you see will tell you to press a key to access a BIOS or device setup. Click the key to open your BIOS.
- After that, go to a BIOS page that displays your PC system information and check to make sure the system is recognizing everything you’ve installed so far.
- Now, dig through BIOS till you find the Boot page, also called “Boot Order” or Boot Priority.
- Change the boot order so that your flash drive is first and the drive on which you want to install your OS is second.
Now, restart the machine. Your computer will boot from the USB port, and the OS installer will pop up. Follow the instructions to complete the installation.
Till now, you must have your gaming PC ready, personalize it, and make full use of its gaming prowess.
Also Read: 5 Best Ad-Free Video Players For Your Android Smartphone.

Comments
Loading…